
Setting Up Screening Recording
Although screen recording is easy, you do need to make the setting available in your Control Center. To enable screen recording, go to:
- Settings > Control Center > Customize Controls
- Select the plus icon (+) next to Screen Recording
A Screen Record icon should now appear in your Control Center, which you can access by swiping up from the bottom of the screen, or swiping down from the top-right edge if you’re on an iPhone X, iPhone XS, iPhone XS Max, or iPhone XR.
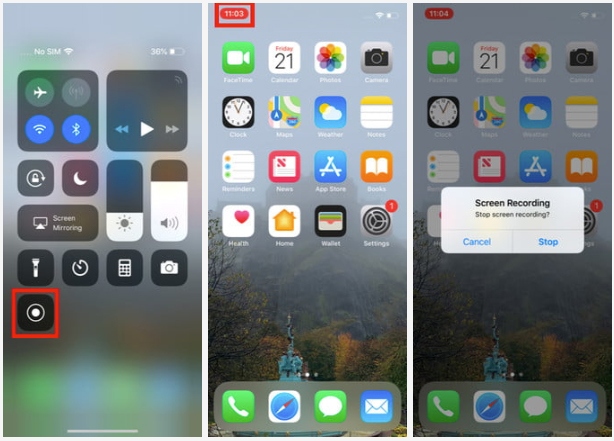
Apple has made screen recording a really simple process. Just open the Control Center and tap the Screen Record icon. It’s a white circle with a circular ring around it.
Once you tap it, you’ll have three seconds to close the Control Center before your phone will start recording. A red bar will appear at the top of your screen to let you know you’re recording.
If you want to add audio to your screen recording, things are a little different. Press the Screen Record icon with extra pressure (via 3D Touch) for more options. A pop-up menu will appear in the middle of your screen, and you can press the Microphone Audio icon, followed by the Start Recording button to get going.
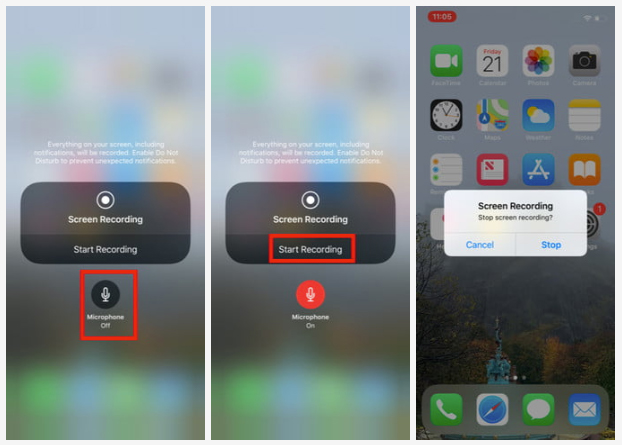
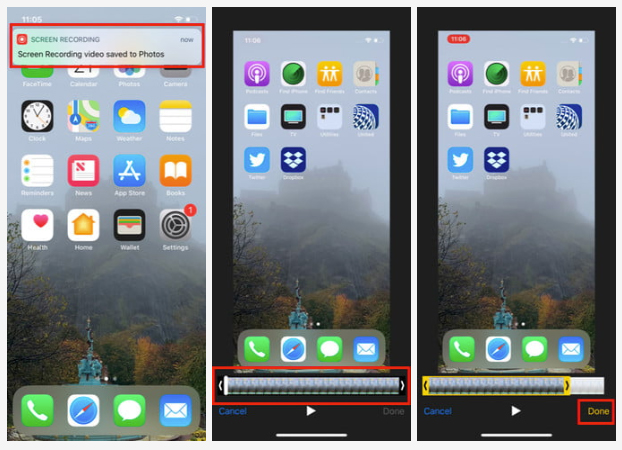
When you are finished recording, the fastest way to stop recording is to tap on the red timer on the top of the screen. You’ll see the message “Screen Recording video saved to Photos” appear in your Notification Center, and you can tap on it to enter the Photos app and watch your video. You can also go to the Control Center and tap on the Screen Record icon to stop recording.
Editing a screen recording
Once you’ve finished recording, you may want to tweak the video. Apple’s Photos app makes it really easy to edit video.
When you’ve finished recording your screen, you’ll see the message “Screen Recording video saved to Photos” in the notification bar. You can either tap on this notification or open the recording in the Photos app to edit.
Setting Up Screening Recording
Although screen recording is easy, you do need to make the setting available in your Control Center. To enable screen recording, go to:
- Settings > Control Center > Customize Controls
- Select the plus icon (+) next to Screen Recording
A Screen Record icon should now appear in your Control Center, which you can access by swiping up from the bottom of the screen, or swiping down from the top-right edge if you’re on an iPhone X, iPhone XS, iPhone XS Max, or iPhone XR.
Apple has made screen recording a really simple process. Just open the Control Center and tap the Screen Record icon. It’s a white circle with a circular ring around it.
Once you tap it, you’ll have three seconds to close the Control Center before your phone will start recording. A red bar will appear at the top of your screen to let you know you’re recording.
If you want to add audio to your screen recording, things are a little different. Press the Screen Record icon with extra pressure (via 3D Touch) for more options. A pop-up menu will appear in the middle of your screen, and you can press the Microphone Audio icon, followed by the Start Recording button to get going.
When you are finished recording, the fastest way to stop recording is to tap on the red timer on the top of the screen. You’ll see the message “Screen Recording video saved to Photos” appear in your Notification Center, and you can tap on it to enter the Photos app and watch your video. You can also go to the Control Center and tap on the Screen Record icon to stop recording.
Editing a screen recording
Once you’ve finished recording, you may want to tweak the video. Apple’s Photos app makes it really easy to edit video.
When you’ve finished recording your screen, you’ll see the message “Screen Recording video saved to Photos” in the notification bar. You can either tap on this notification or open the recording in the Photos app to edit.
Screen recordings are a built-in feature of iOS 11 and newer. No need to purchase additional software!
Screen recording and compatibility with other apps
Remember, some apps may slightly change the way screen recording works or add new screen recording features. A good example is Mirror for Samsung TVs, which adds an option to Apple’s screen recorder to enable you to mirror the recording to a connected Samsung TV. You may want to look into such apps if you wish the Apple screen recorder had more functionality.